Showcase your Software
In this tutorial, we will walk through using the Research Software Encyclopedia (rse) with criteria hosted here to generate a static interface to display your research software.
Who is this intended for?
If you are faculty, student, or some research staff that maintains a set of software, you might want to have a place to share this set, meaning a version controlled record (GitHub repository) and web interfaces to interact with it.
1. Install the Research Software Encyclopedia
You can first install the rse software with pip:
pip install rse[all]
We choose to install “all” so that dependencies for generating a web interface are included.
2. Create your repository
Next, cd into a folder that you intend to create as a GitHub repository. For example, I’m going to call mine “software”:
mkdir software
cd software
git init
And of course you’ll need to follow standard instructions for creating a new repo.
3. Create a new rse database
You can then initialize a new research software database.
$ rse init
INFO:rse.main.config:Generating configuration file rse.ini
INFO:rse.main:Database: filesystem
It will create an rse.ini configuration file in your folder! This is a fairly
simple configuration file that just keeps track of your database preferences.
4. Add software
Let’s add software repos to our database! You can either add via one off commands:
rse add github.com/singularityhub/sregistry
INFO:rse.main.database.filesystem:github/singularityhub/sregistry was added to the the database.
Or you can import from a file with a single list of repository names:
# repos.txt
github.com/singularityhub/sregistry
github.com/singularityhub/singularity-compose
github.com/singularityhub/singularity-cli
github.com/singularityhub/singularity-docker
$ rse add --file repos.txt
INFO:rse.main:Database: filesystem
INFO:rse.main.database.filesystem:github/singularityhub/singularity-compose was added to the the database.
INFO:rse.main.database.filesystem:github/singularityhub/singularity-cli was added to the the database.
INFO:rse.main.database.filesystem:github/singularityhub/singularity-docker was added to the the database.
Notice that the previously added repository “singularityhub/sregistry” was not added again. If you inspect your file system, you’ll notice that we now have folders and metadata files for each repository added.
$ tree database/
database/
└── github
    └── singularityhub
        ├── singularity-cli
        │   └── metadata.json
        ├── singularity-compose
        │   └── metadata.json
        ├── singularity-docker
        │   └── metadata.json
        └── sregistry
            └── metadata.json
At this point you can further interact with your software database via any of the commands. You might also be interested in local and bulk annotation of your software. You probably (minimally) want to add the files to git and push to your remote.
5. Export an interface
More likely you want a fun interface for others to explore your software. You can generate that, perhaps in a subfolder called “docs” to generate on GitHub pages. If your repository name is “software,” you would need to first export a URL prefix, along with the GitHub address that you intend to serve it from:
export RSE_URL_PREFIX=/software-example
export RSE_ISSUE_ENDPOINT=https://github.com/rseng/software-example
$ rse export --type static-web docs/
This again generates all the static files you’d need for your GitHub pages, and the issue endpoint will be available if you want others to be able to add annotations via issues.
$ tree docs/
docs/
├── api
│   ├── criteria
│   │   └── index.json
│   ├── repos
│   │   └── index.json
│   └── taxonomy
│       └── index.json
├── data.json
├── index.html
├── repository
│   └── github
│       └── singularityhub
│           ├── singularity-cli
│           │   ├── annotate-criteria
│           │   │   └── index.html
│           │   ├── annotate-taxonomy
│           │   │   └── index.html
│           │   └── index.html
│           ├── singularity-compose
│           │   ├── annotate-criteria
│           │   │   └── index.html
│           │   ├── annotate-taxonomy
│           │   │   └── index.html
│           │   └── index.html
│           ├── singularity-docker
│           │   ├── annotate-criteria
│           │   │   └── index.html
│           │   ├── annotate-taxonomy
│           │   │   └── index.html
│           │   └── index.html
│           └── sregistry
│               ├── annotate-criteria
│               │   └── index.html
│               ├── annotate-taxonomy
│               │   └── index.html
│               └── index.html
└── static
    └── css
        └── style.css

21 directories, 18 files
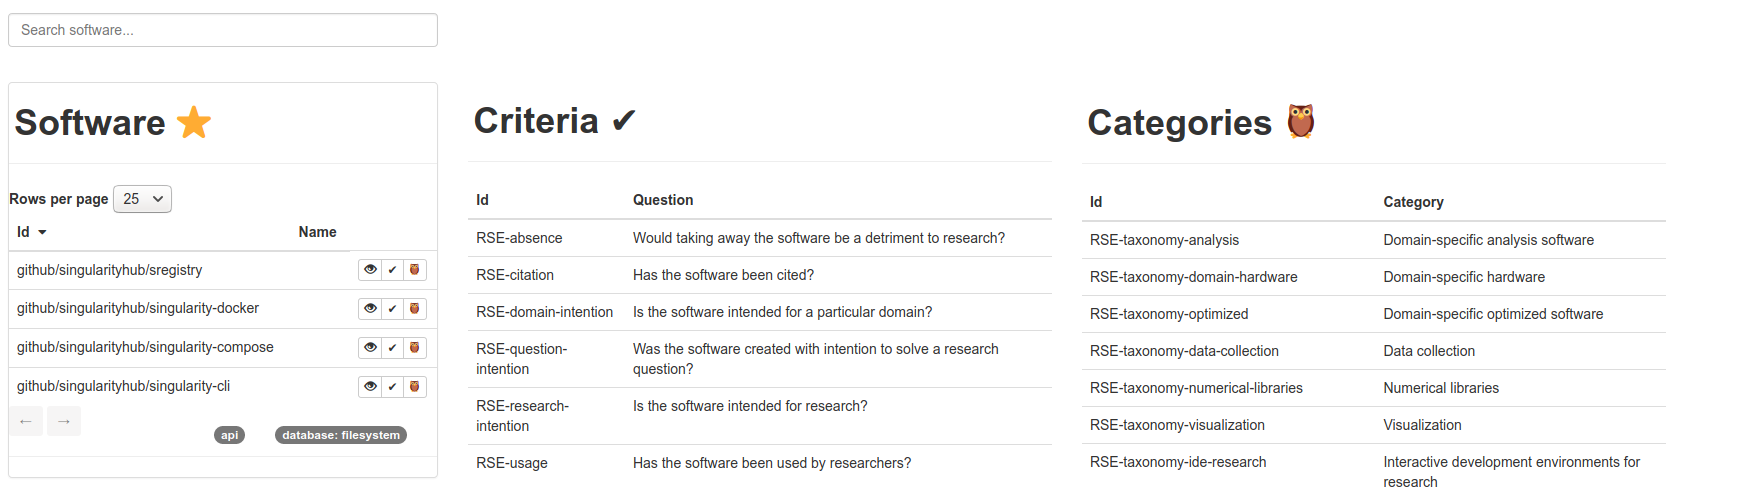
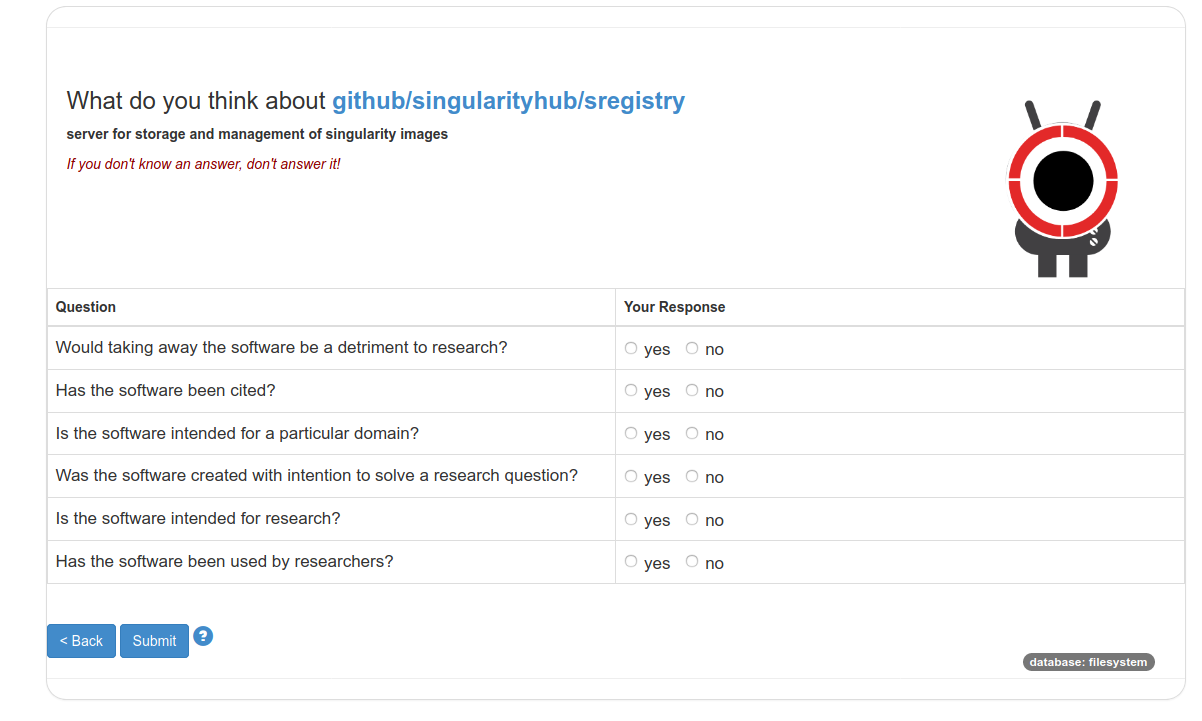
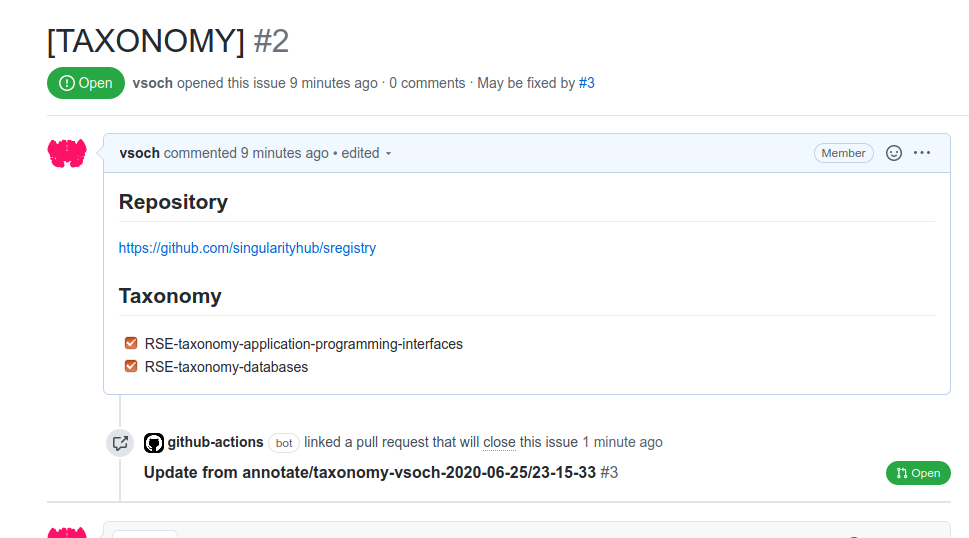
The interface portal is shown at the top of the post! From there you can see criteria and taxonomy items defined when you generated the interface, along with your list of software. For each, you can click on the owl (🦉️) to annotate for taxonomy categories, or the check (✔️) to annotate for criteria. Here is annotating for the criteria:
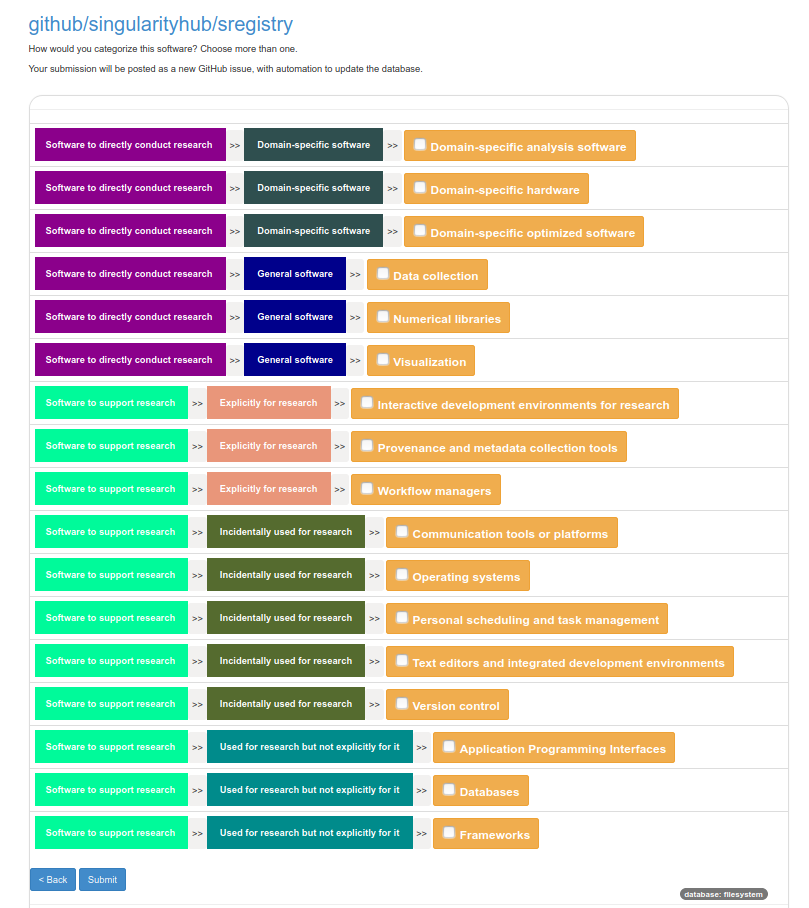
And here is for annotating for the taxonomy:
Continue reading to see how these interfaces can trigger an automated workflow to annotate your database.
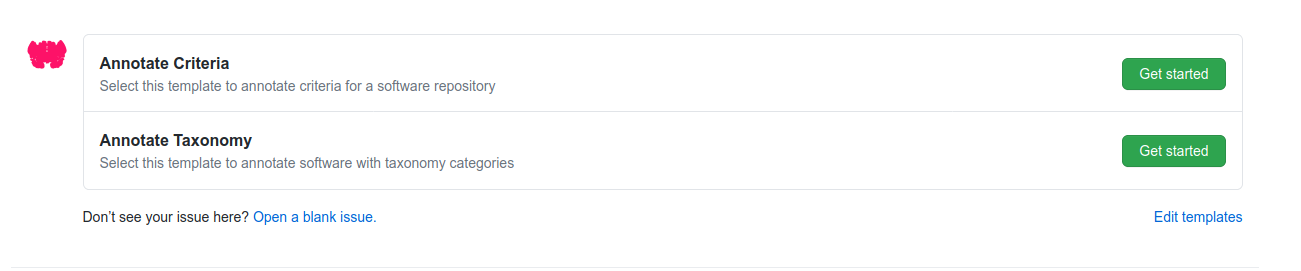
6. Add Issue Templates and Annotation
If you add a set of templates and a GitHub workflow that knows how to parse them into pull requests that will annotate the software, your static web interface becomes an annotation interface! Specifically, you will need these files:
mkdir -p .github/workflows .github/ISSUE_TEMPLATE

cd .github/ISSUE_TEMPLATE
wget https://raw.githubusercontent.com/rseng/software/master/.github/ISSUE_TEMPLATE/annotate-criteria.md
wget https://raw.githubusercontent.com/rseng/software/master/.github/ISSUE_TEMPLATE/annotate-taxonomy.md

cd ../workflows
wget https://raw.githubusercontent.com/rseng/software/master/.github/workflows/issue-annotation.yml
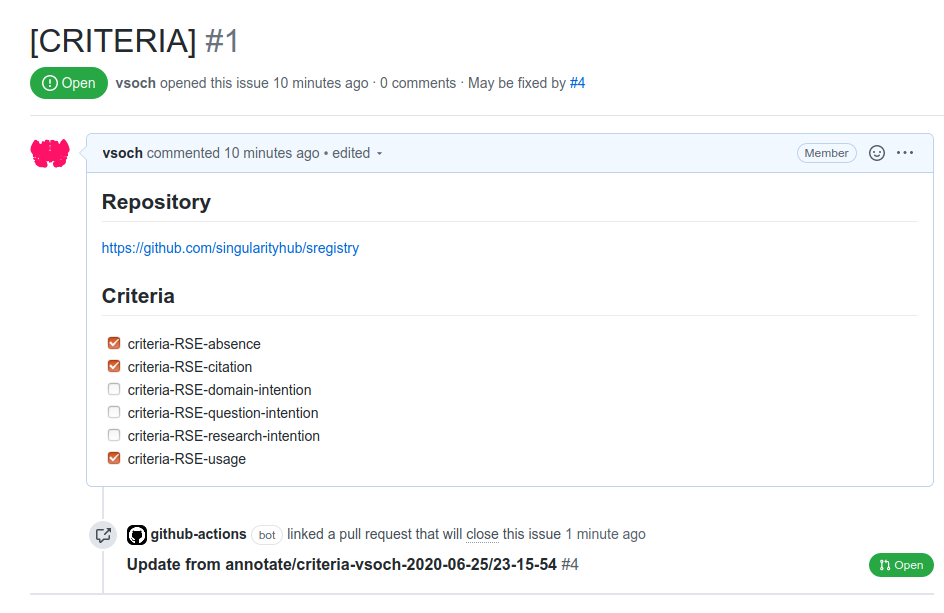
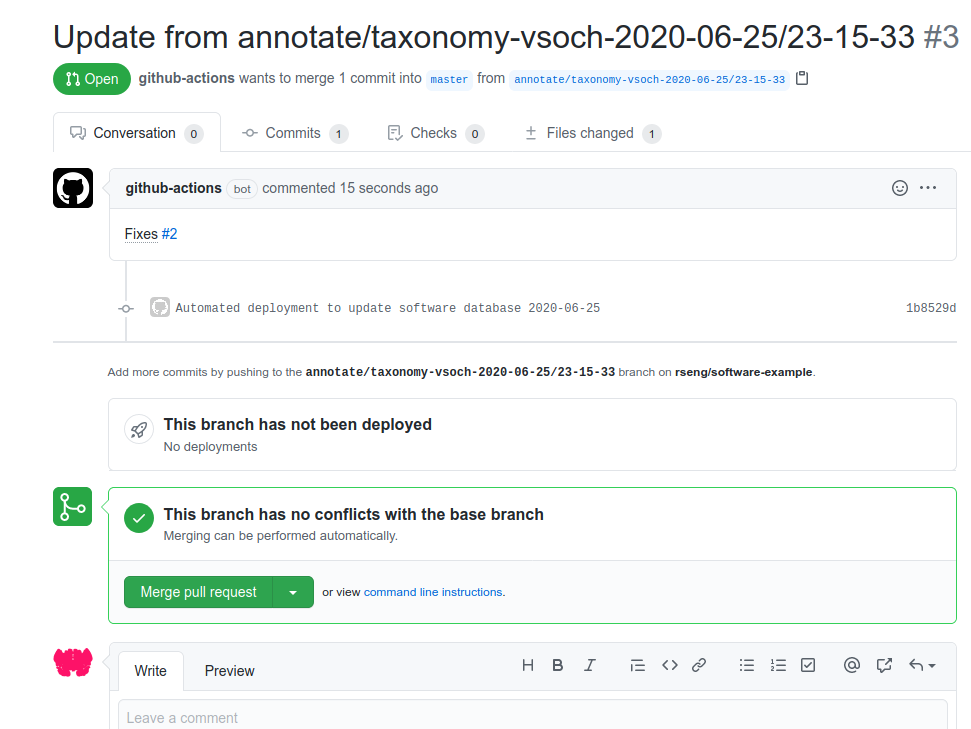
After these templates are added, when a visitor clicks submit on your interface served on GitHub pages, it will open an issue that (when posted) will trigger a workflow to open a pull request and complete the annotation on behalf of the user’s username. Here are example issues generated:
And the subsequent pull requests generated! You can see both at rseng/software-example.
And any user can open an issue using your template to accomplish the same. Cool!
You might also want some ability to run a job and update your software, or just refresh the interface. Take a look at the templates here for ideas (and please open an issue if you need help!).
7. Share your Site!
At this point you can commit files, push, and go into your repository settings to enable GitHub pages. You can share the base url with others, or even just one repository on social media to ask for annotations. By the way, we encourage you to add your software to the rseng/software database. If you have any other ideas or suggestions for this tool, please open an issue there or on the research software encyclopedia. If you want to discuss or work on specific criteria or the taxonomy, then you can do that here.
Recent Posts
- Posted on 21 Mar 2021
- Posted on 07 Mar 2021
- Posted on 21 Feb 2021
- Posted on 21 Feb 2021